Tinting an image : hints of the problem
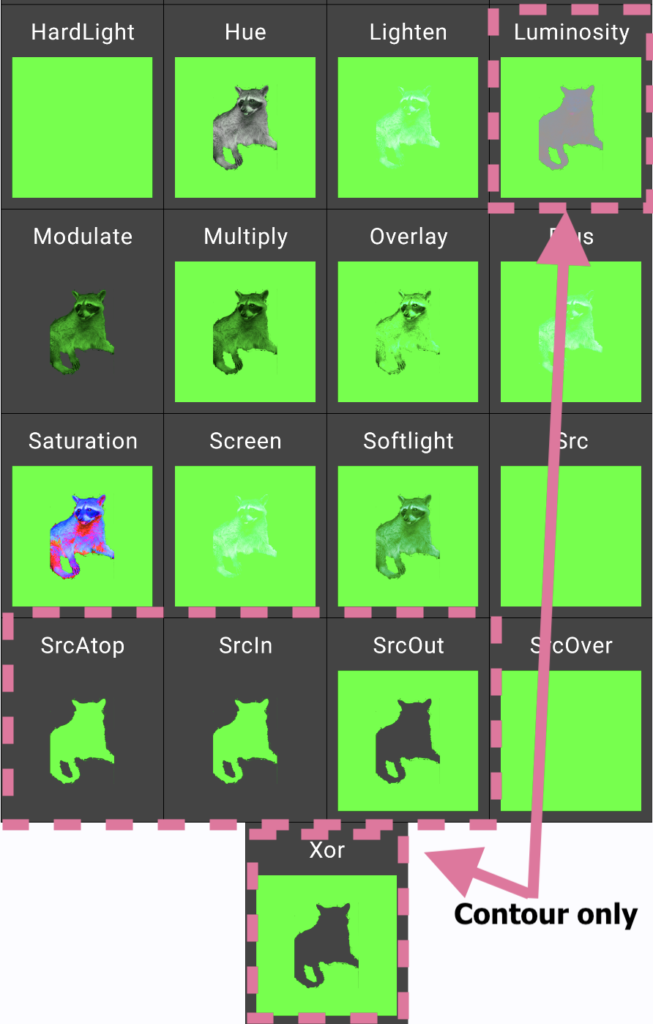
When we first started adding color over a raster image in this previous article, you may have noticed that some values of BlendMode we used resulted in the image being used only as a contour.
When we are trying to add a pattern to an image, this is not what we want. As it happened, we were using BlendMode only to define how to tint an image with a ColorFilter. In this scenario, we saw that using BlendMode.Modulate is the best fit.
Image(
   painter = painterResource(id = R.drawable.ic_white_nosed_coati_foreground),
   contentDescription = "White nosed coati PNG image with transparent background",
   contentScale = ContentScale.Inside,
   colorFilter = tint(blendMode = blendMode, color = Color.Green),
   modifier = Modifier.size(100.dp)
)
Adding pattern and tint to a simple image : no problem !
In a later post, when adding a pattern and a color to an image (which happened to be a vector image made up only of a contour), this limitation was still present, but not noticeable due to the type of image we were using.
To add both pattern and color, we needed to work in the DrawScope.
Box(modifier = Modifier
    .graphicsLayer(compositingStrategy = CompositingStrategy.Offscreen)
   .drawWithContent {
       drawRect(
           brush = polkaDotBrush,
           alpha = 1f,
           colorFilter = ColorFilter.tint(polkaDotColor),
           )
       drawImage(
           image = objectToDrawOnAsImageBitmap,
           dstSize = IntSize(
               this@drawWithContent.size.width.roundToInt(),
               this@drawWithContent.size.height.roundToInt()
           ),
           colorFilter = ColorFilter.tint(Color.Red),
           blendMode = blendMode,
           )
   })
A problematic (sofa bean bag) chair
However, when we try to use the same strategy with a raster image which is not a simple contour, we see that we need to make some changes.
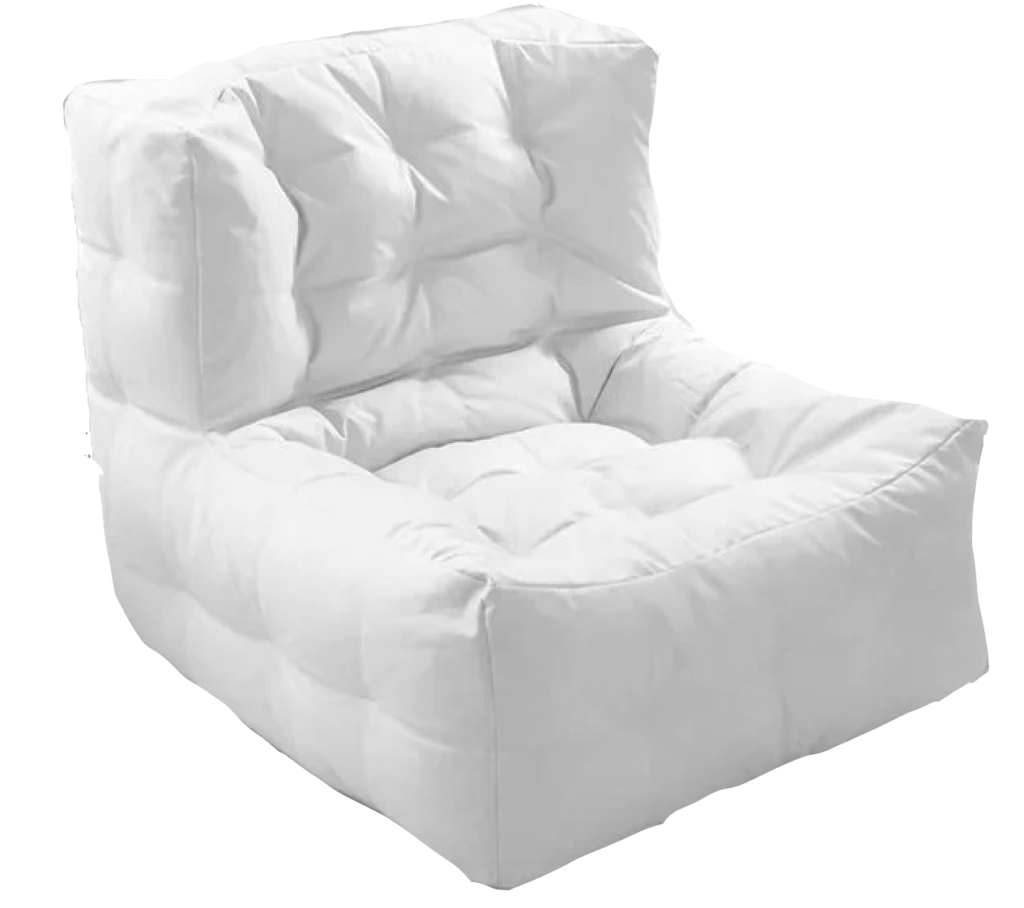
To settle into the problem, let’s look at this lovely, comfy chair I borrowed from The House of Bloc. Apparently it is a Sofa Bean Bag Chair, but let’s just call it a Chair for brevity.
This image has only been desaturated so that its volumes are drawn in grayscale without adding color that would compete with our tint and pattern.
This image was chosen because the contour is very simple, but all the identifying details come from the values of gray inside the contour.
There is a problem with the Chair
The result if we use the same strategy for piling up our layers of color, image, and pattern as we did for the suitcase image makes it obvious what is lost. We only see the image contour, and none of its details. Inside the contour, there is only the color and pattern that we have added.
Patterning the chair: familiar territory
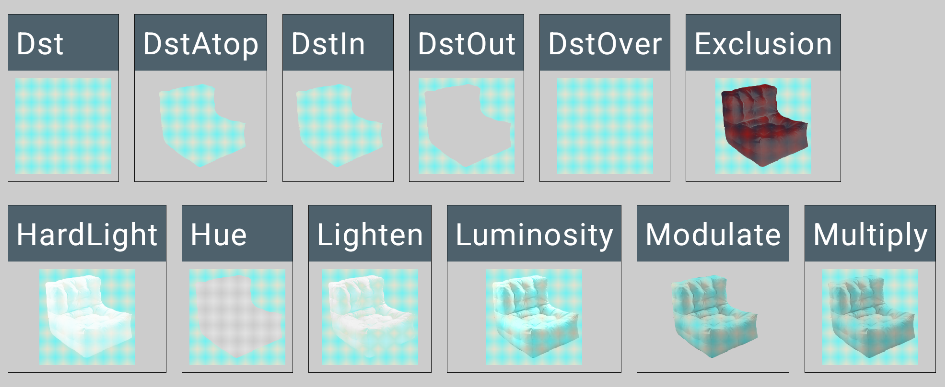
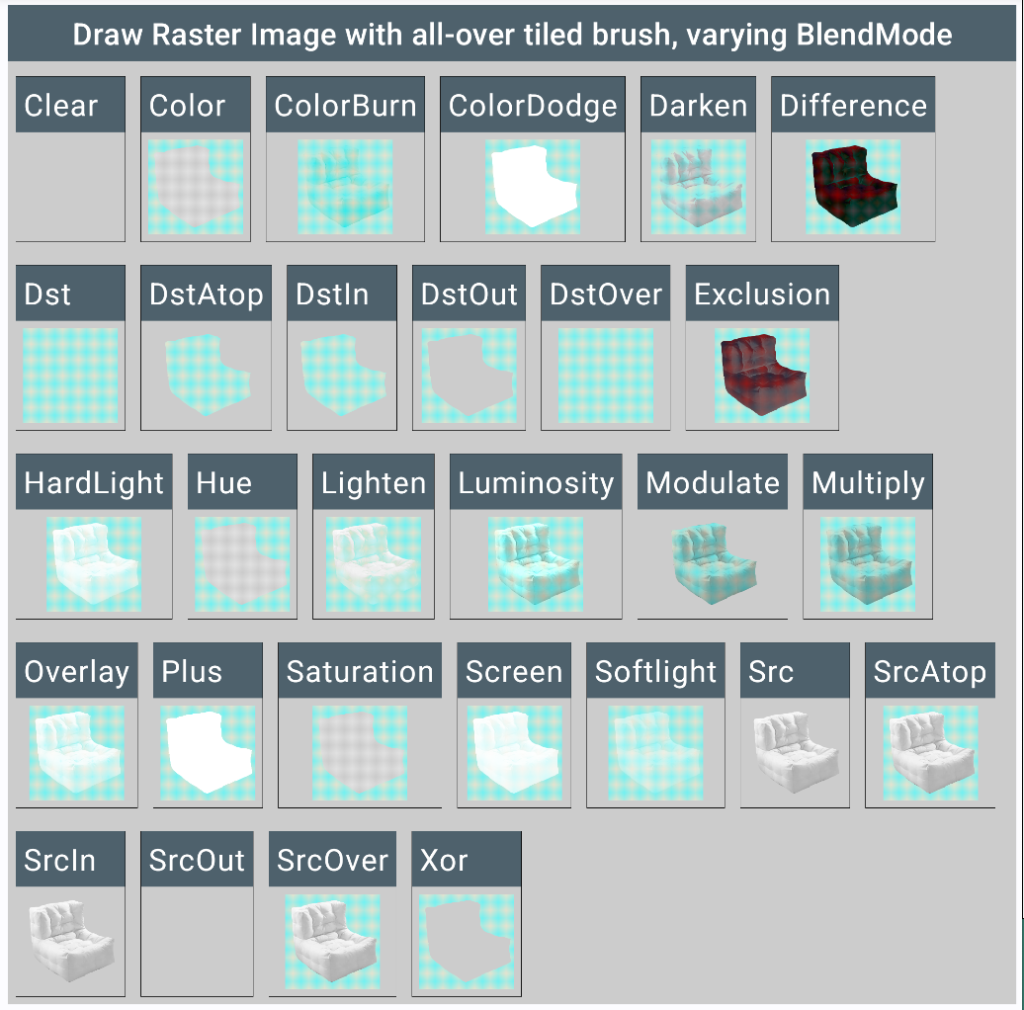
If we are adding a colored pattern (in this example, a light turquoise checkered pattern) to the chair, things are simpler and we can use the same code as for a contour image.
If you looked at the post with the racoon picture, this is quite similar. In the illustration below we see that, again, using drawImage with BlendMode.Modulate is an appropriate way to apply an all-over pattern to the image while keeping its grayscale details.
The code:
Box(modifier = Modifier
   .graphicsLayer(Offscreen)
   .drawWithContent {
       drawRect(
           brush = tilted1Brush,
           alpha = 1f,
       )
       drawRect(
           brush = tilted2Brush,
           alpha = .5f,
       )
       drawImage(
           image = objectToFillImage,
           blendMode = blendMode,
           dstSize = IntSize(
               this@drawWithContent.size.width.roundToInt(),
               this@drawWithContent.size.height.roundToInt()
           ),
       )
   })
Adding Pattern and Color to a complex image
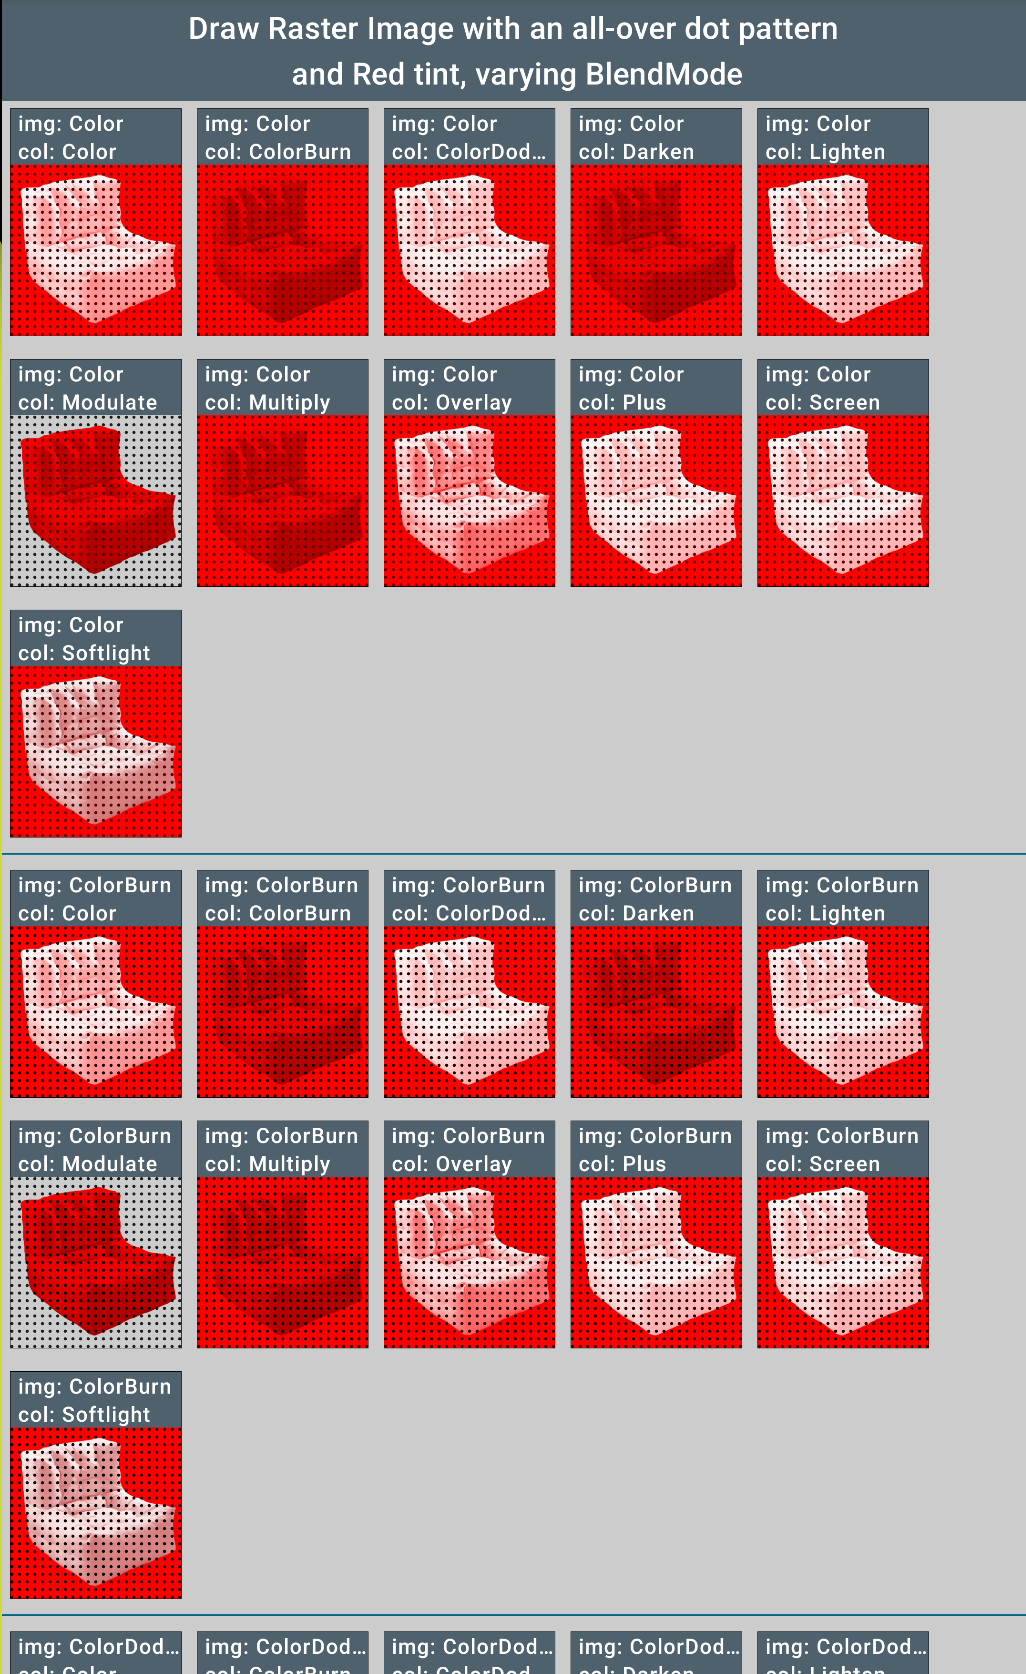
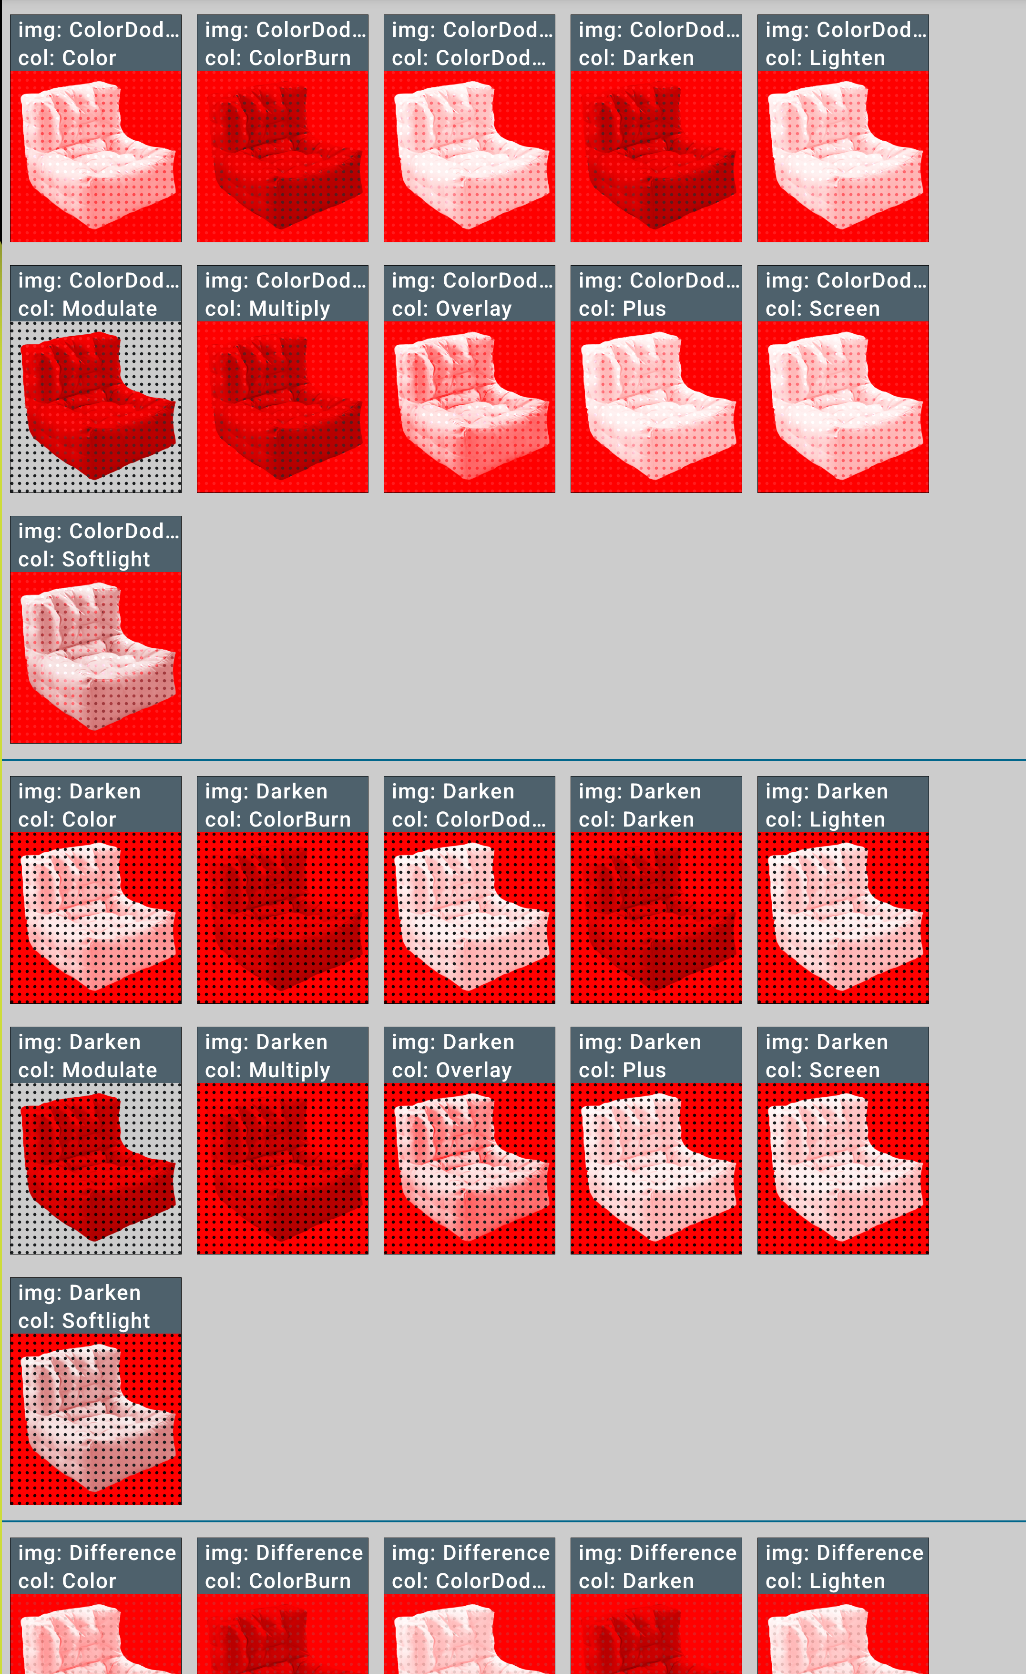
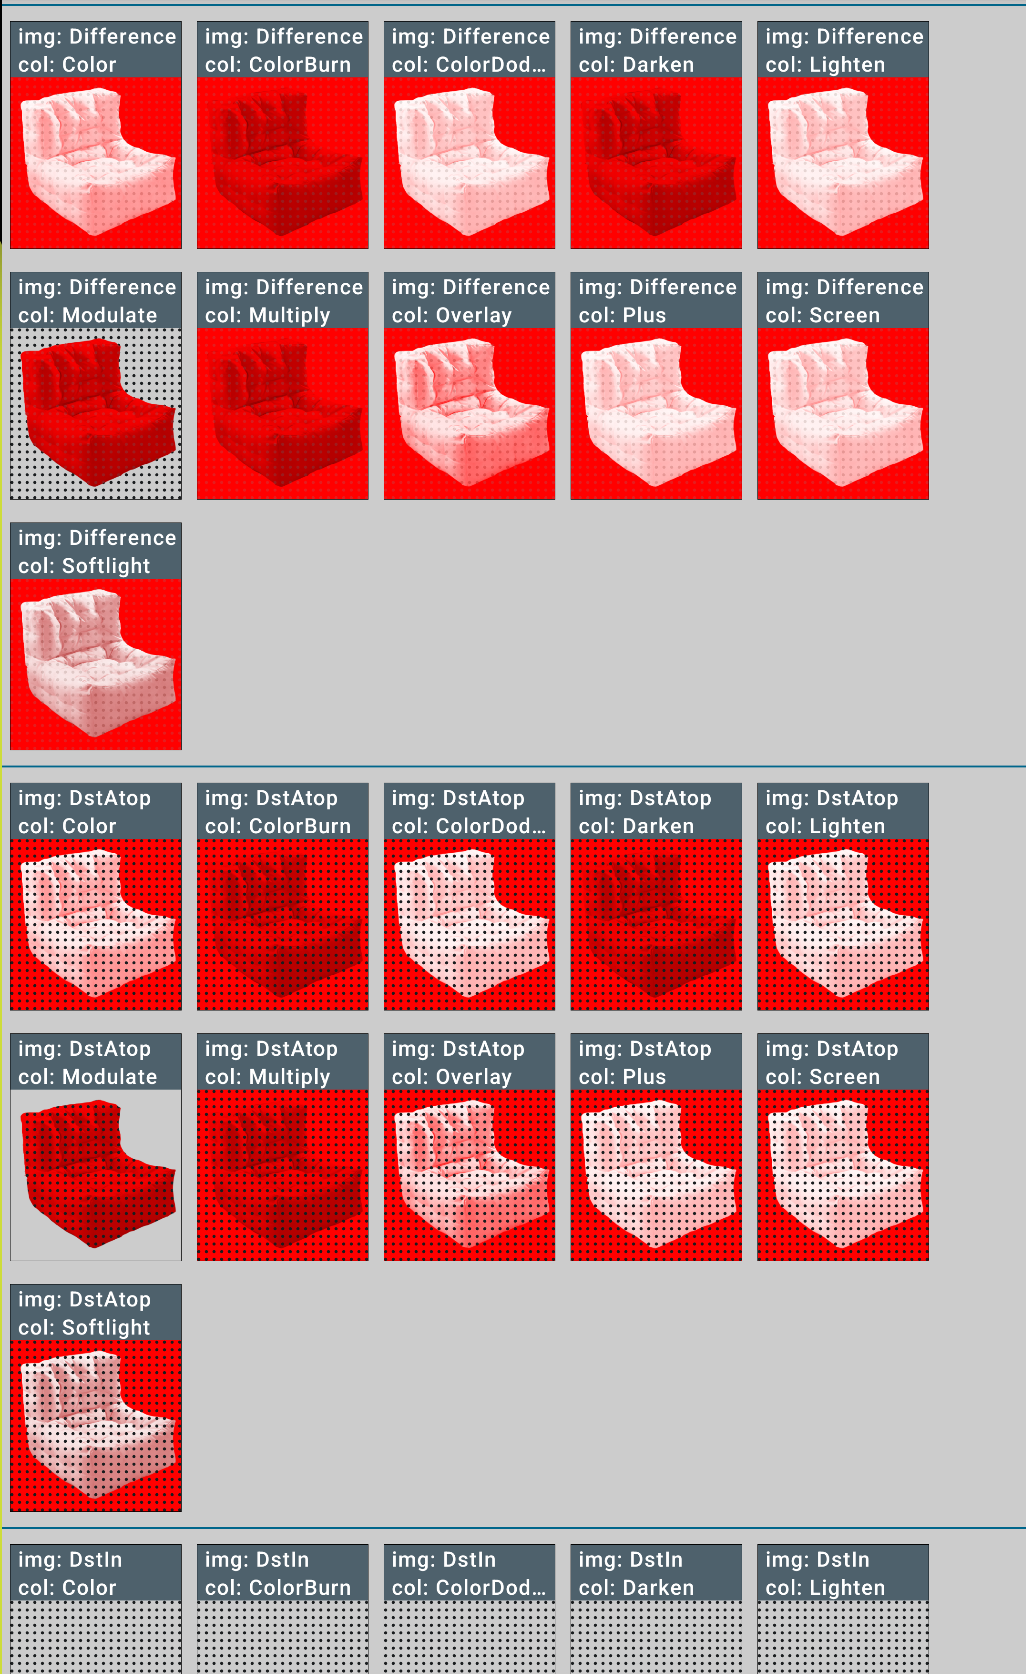
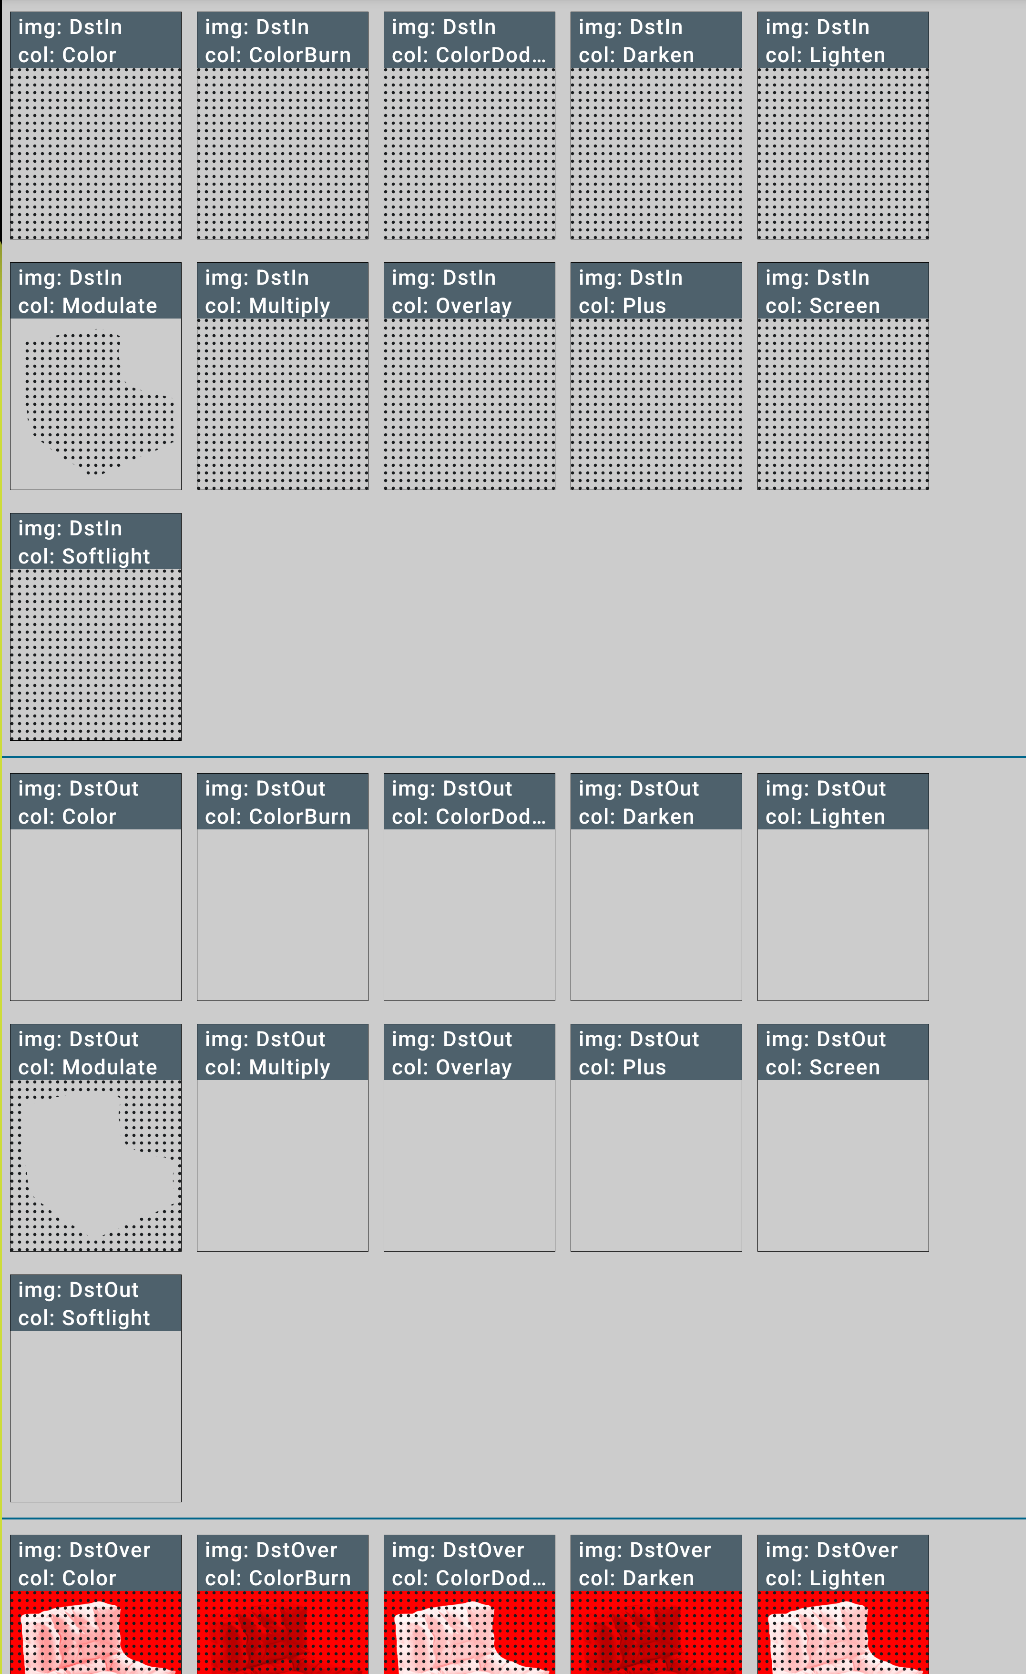
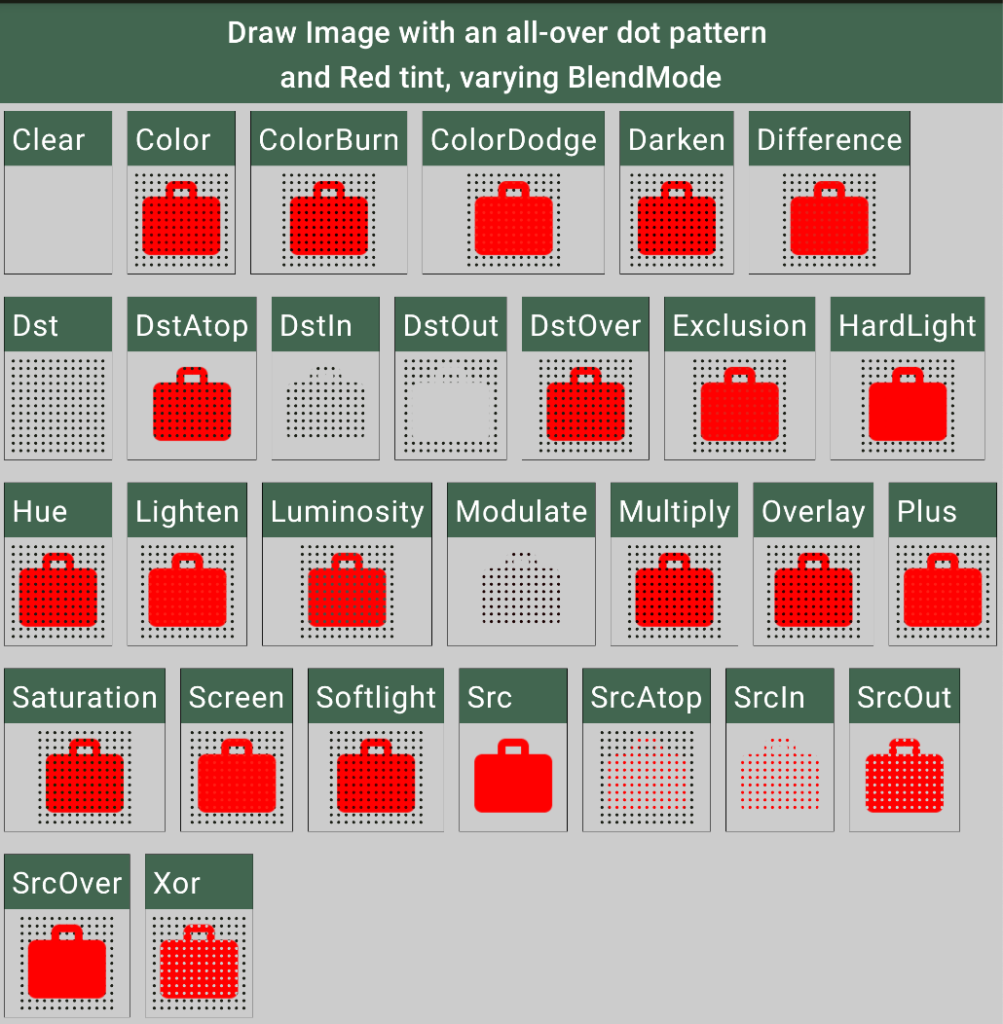
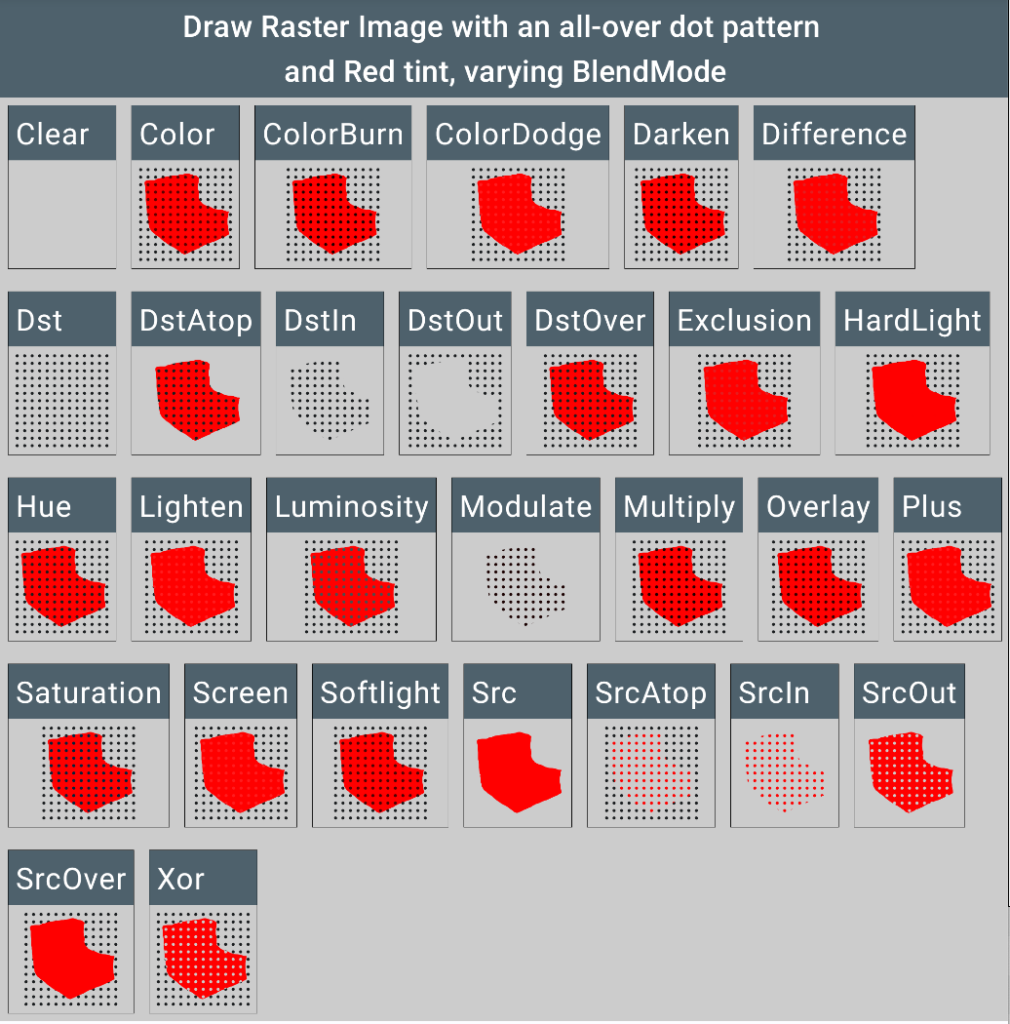
This is where things get tricky. We are not only adding a pattern (a polka-dot pattern with a black dot color) to the image, but also tinting the image in red.
From the drawing perspective, this is like having to composite 3 layers: a rectangle of colored pattern, the image, and the final color. The two additional «layers» must each be composited over with various BlendModes.
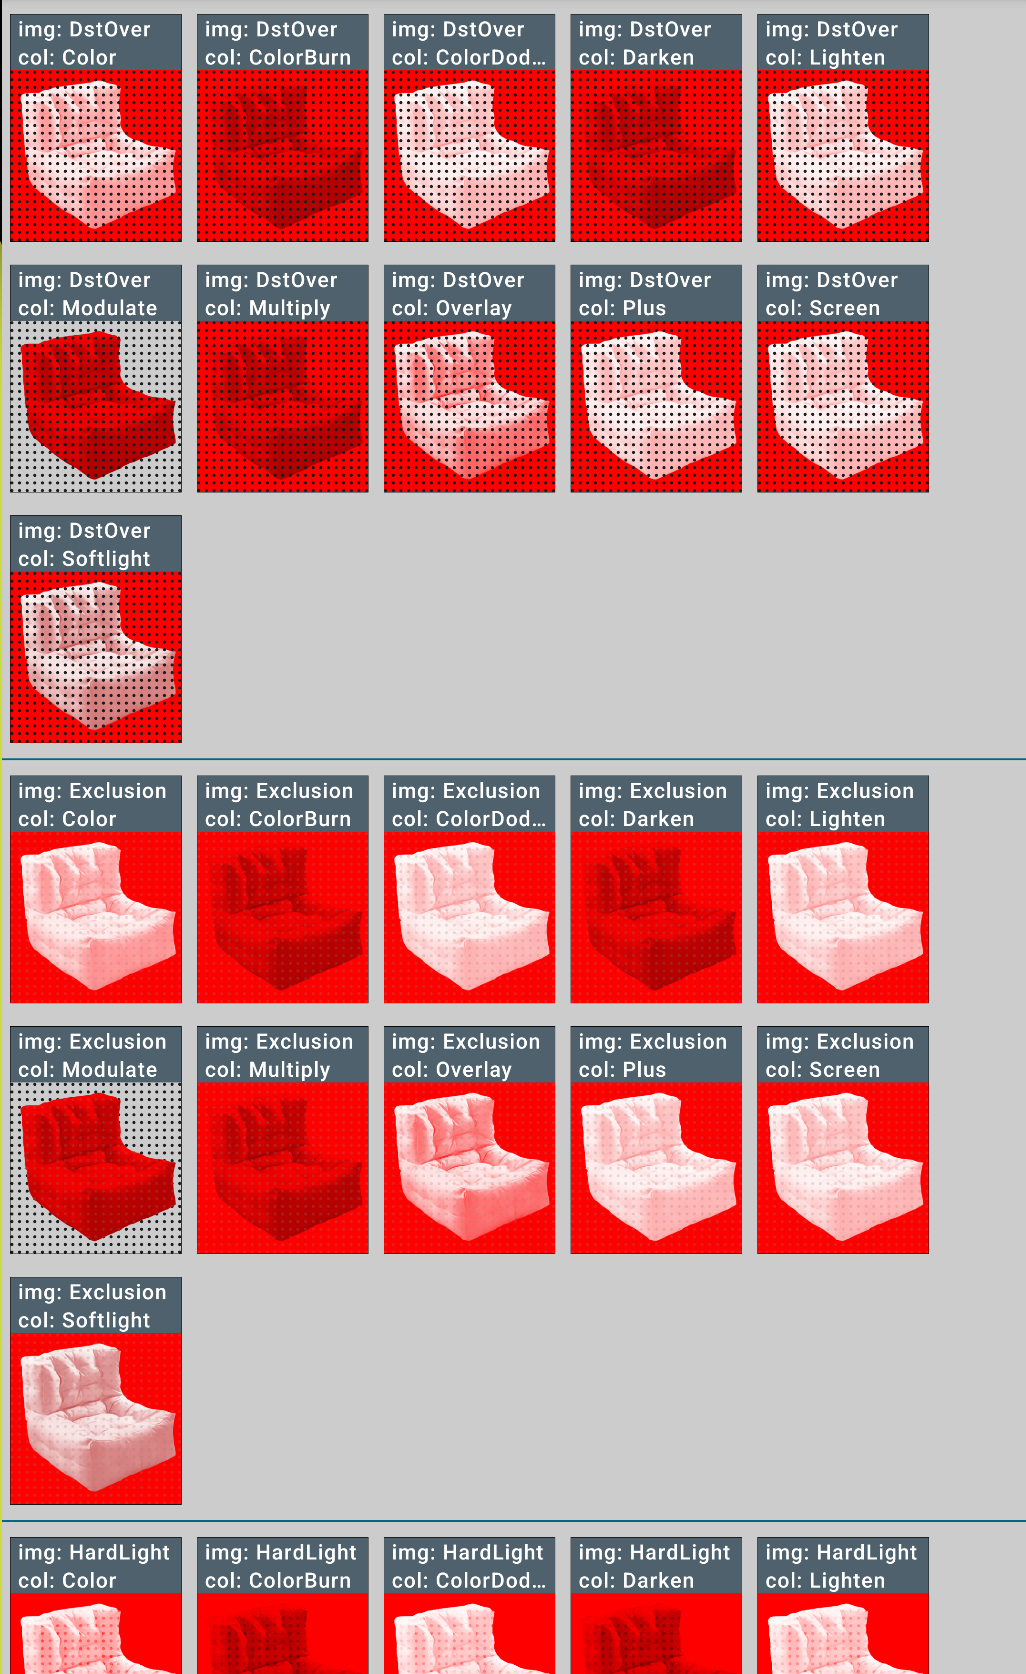
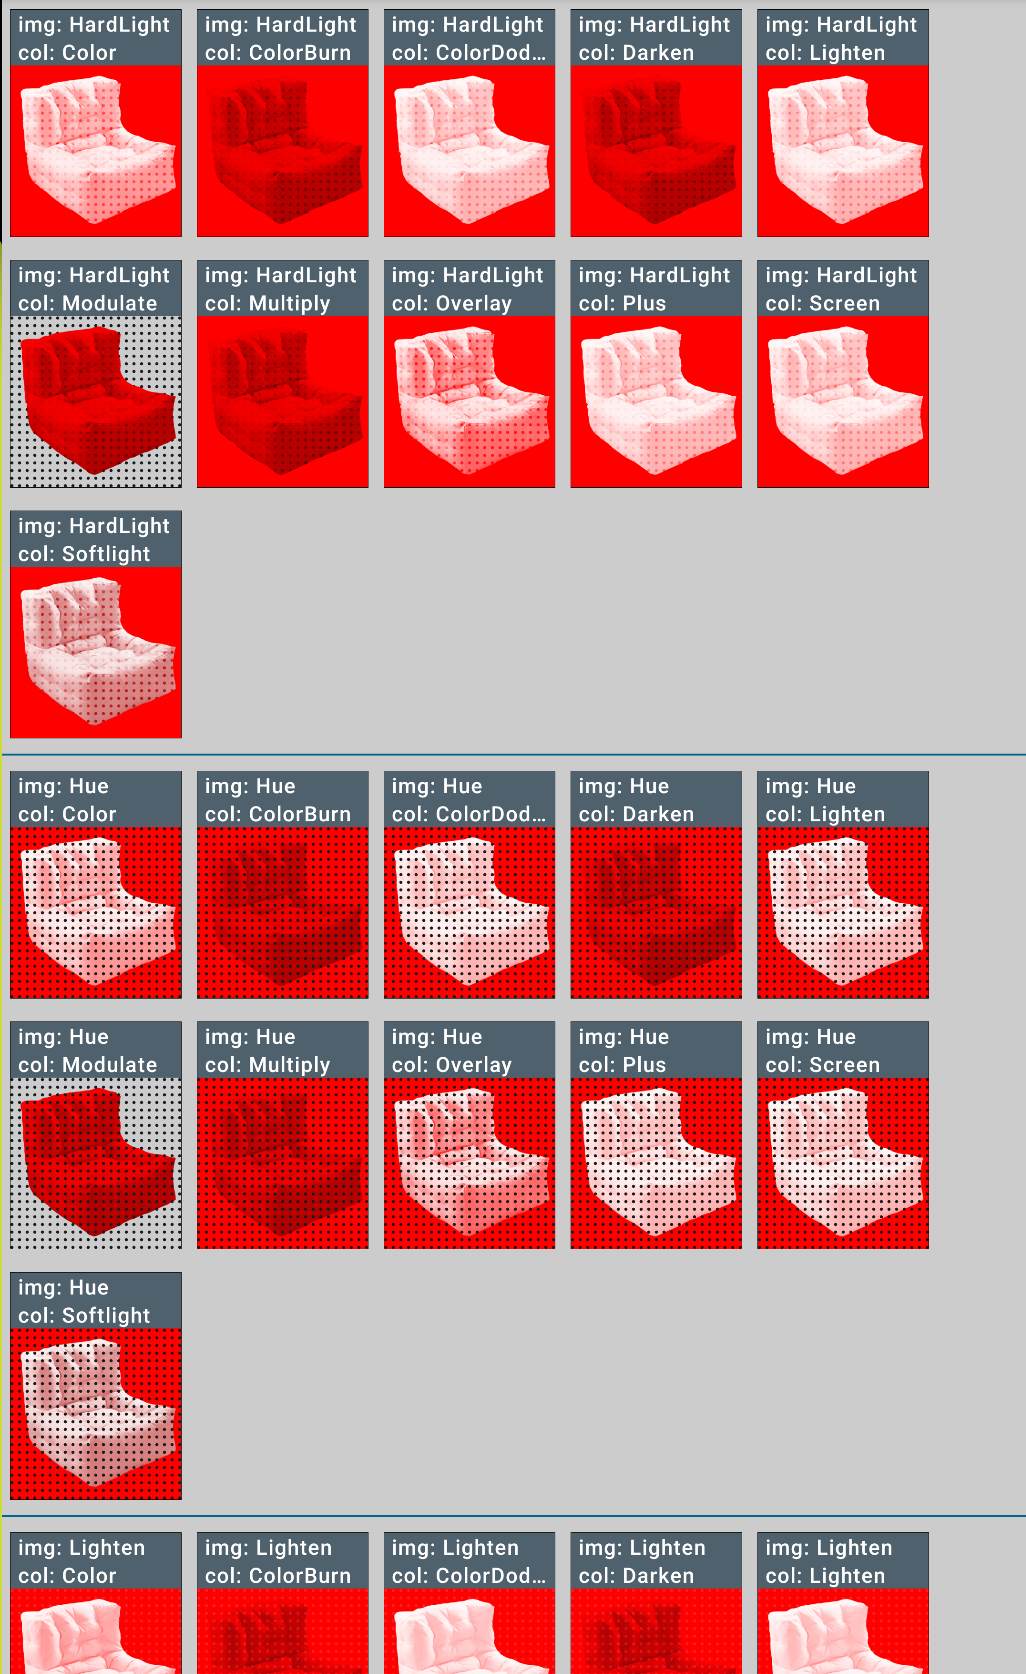
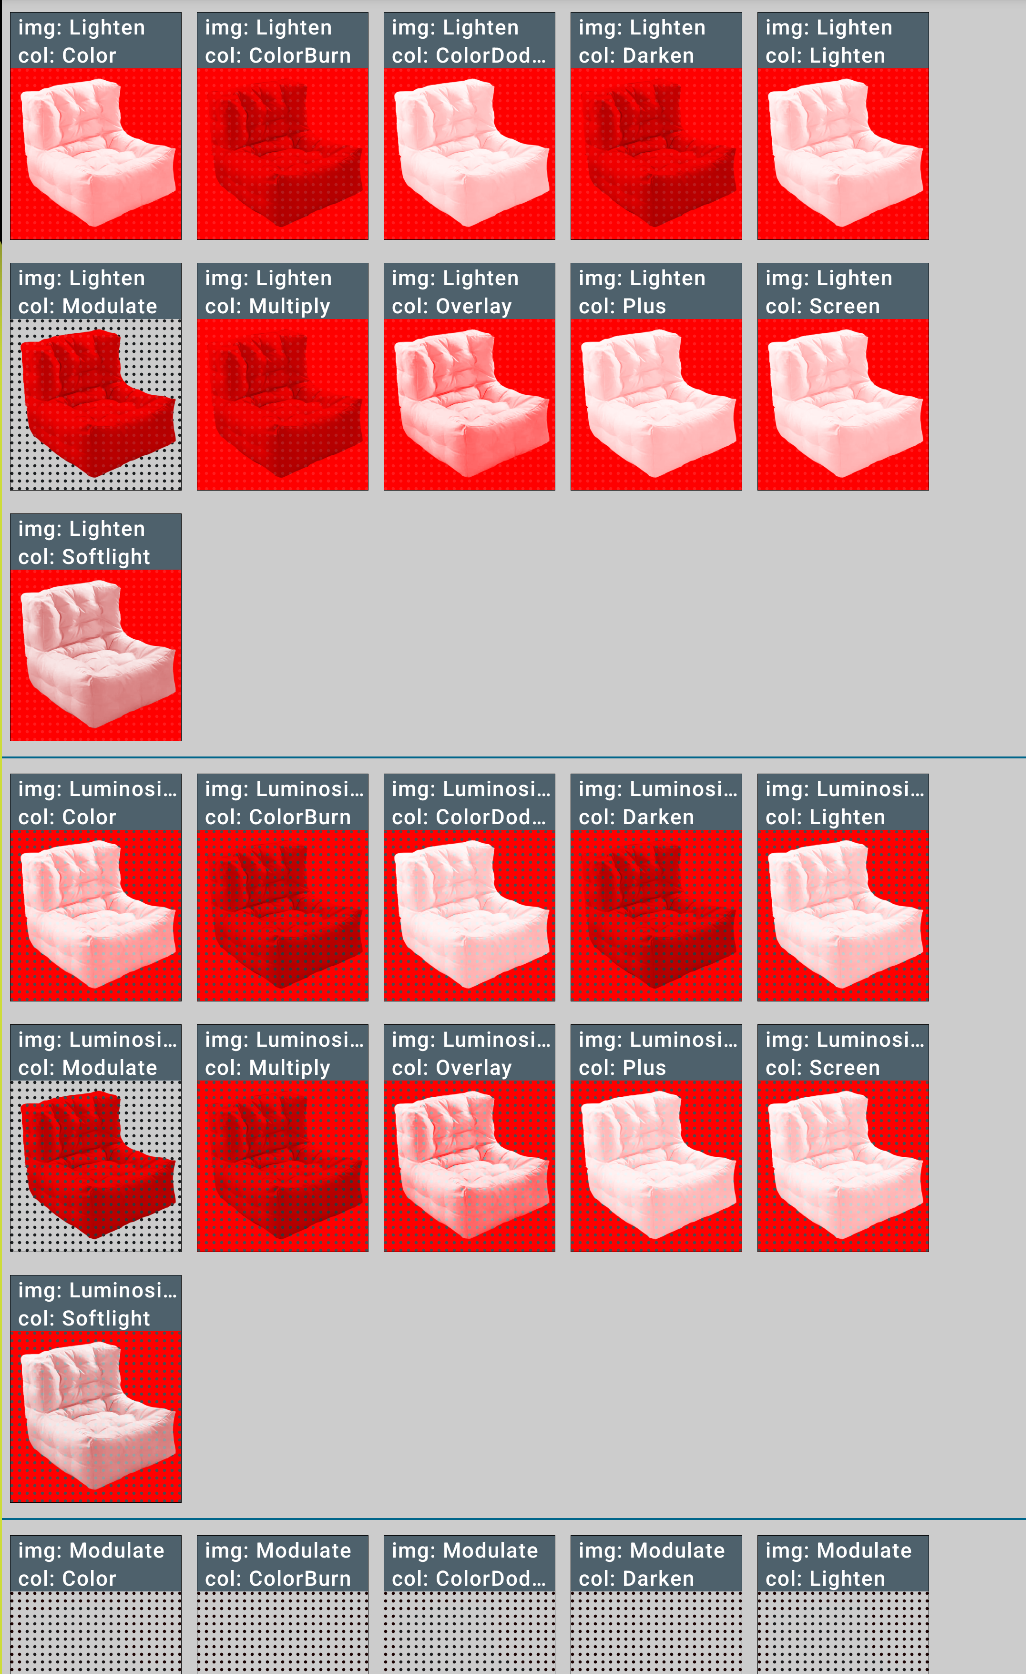
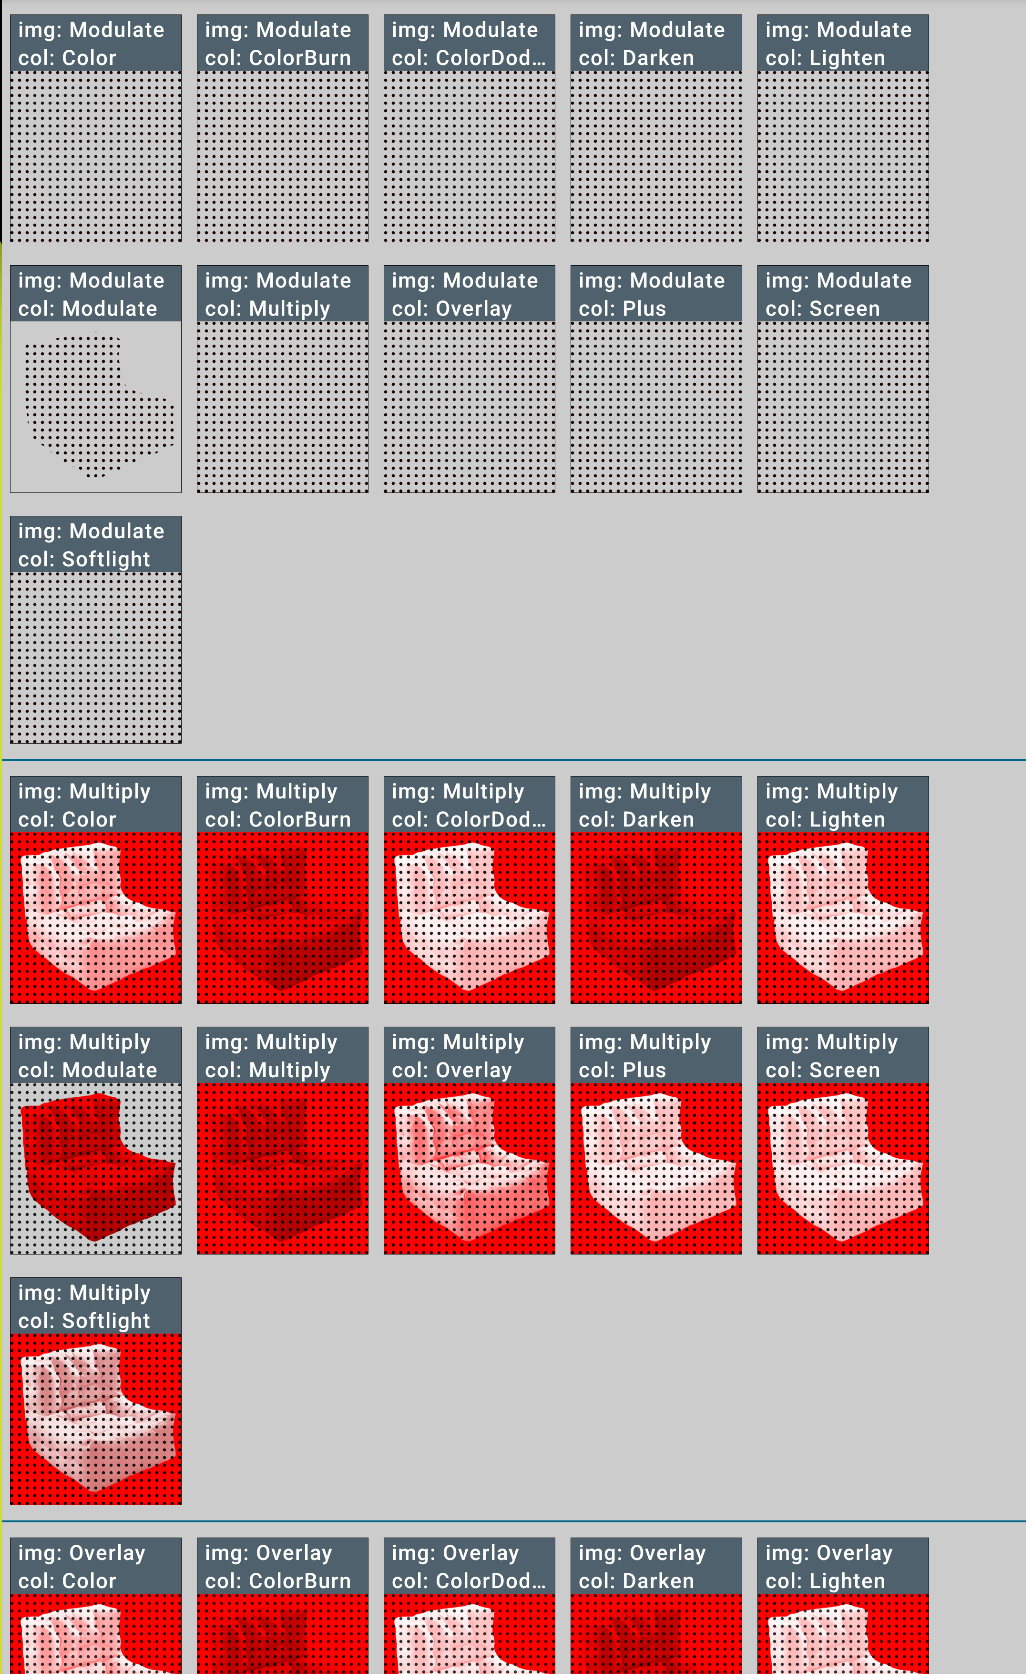
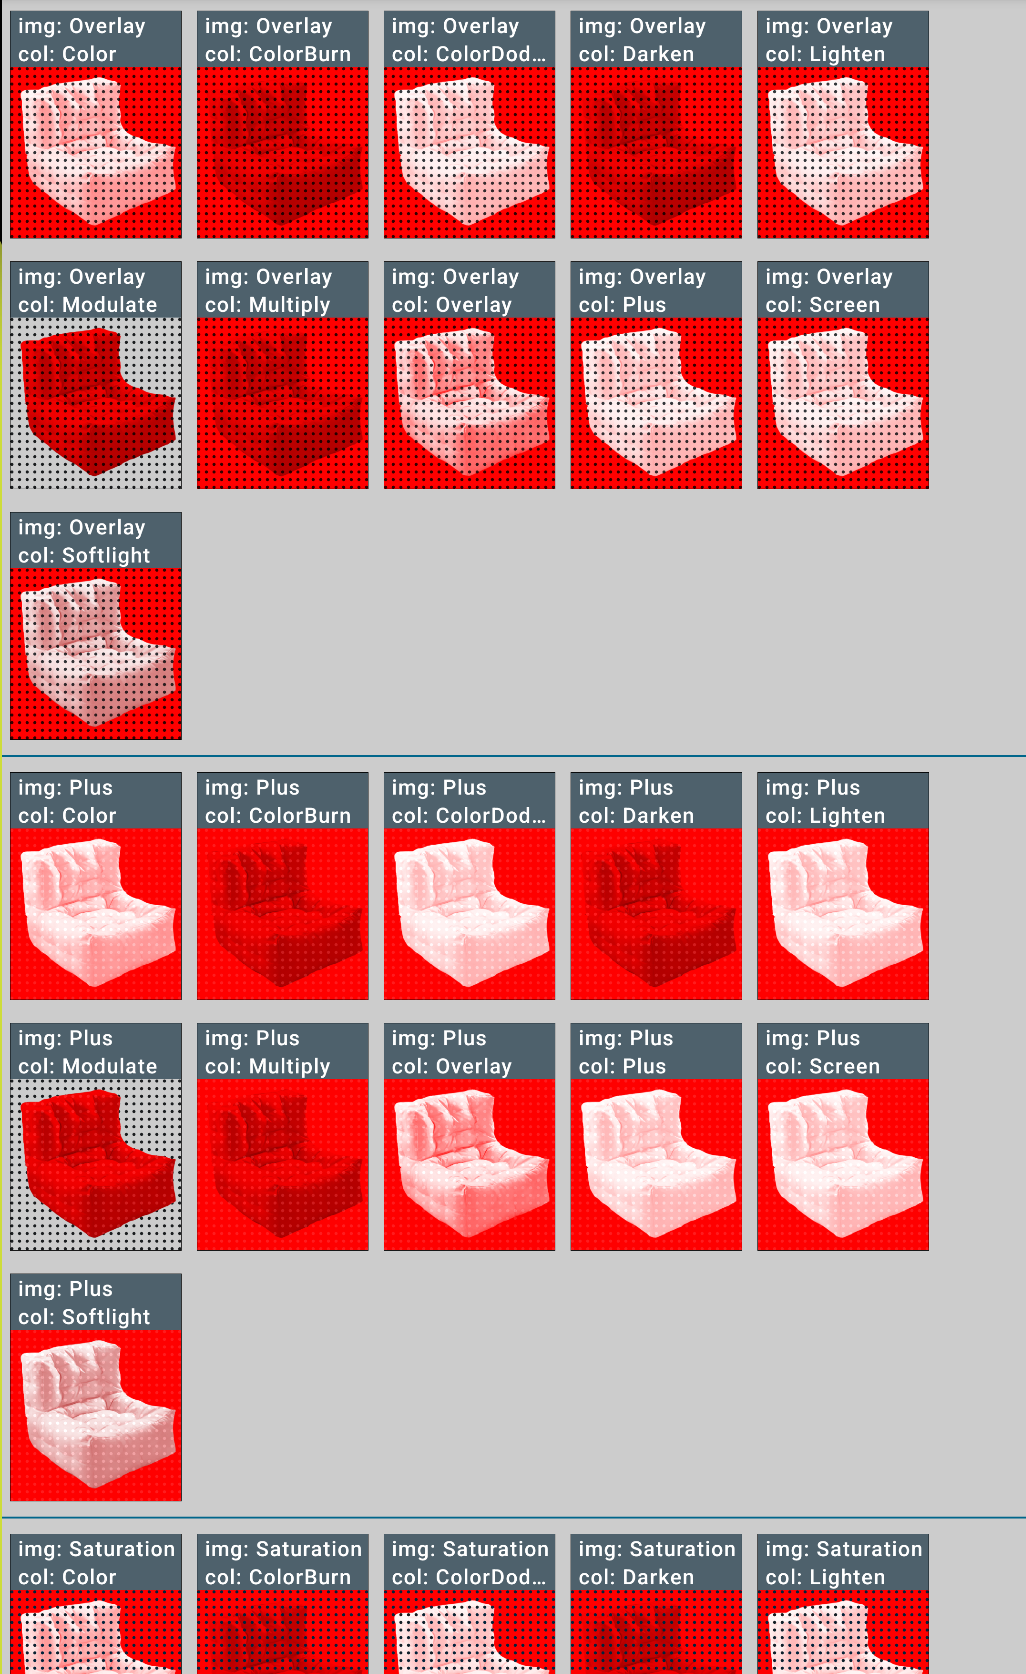
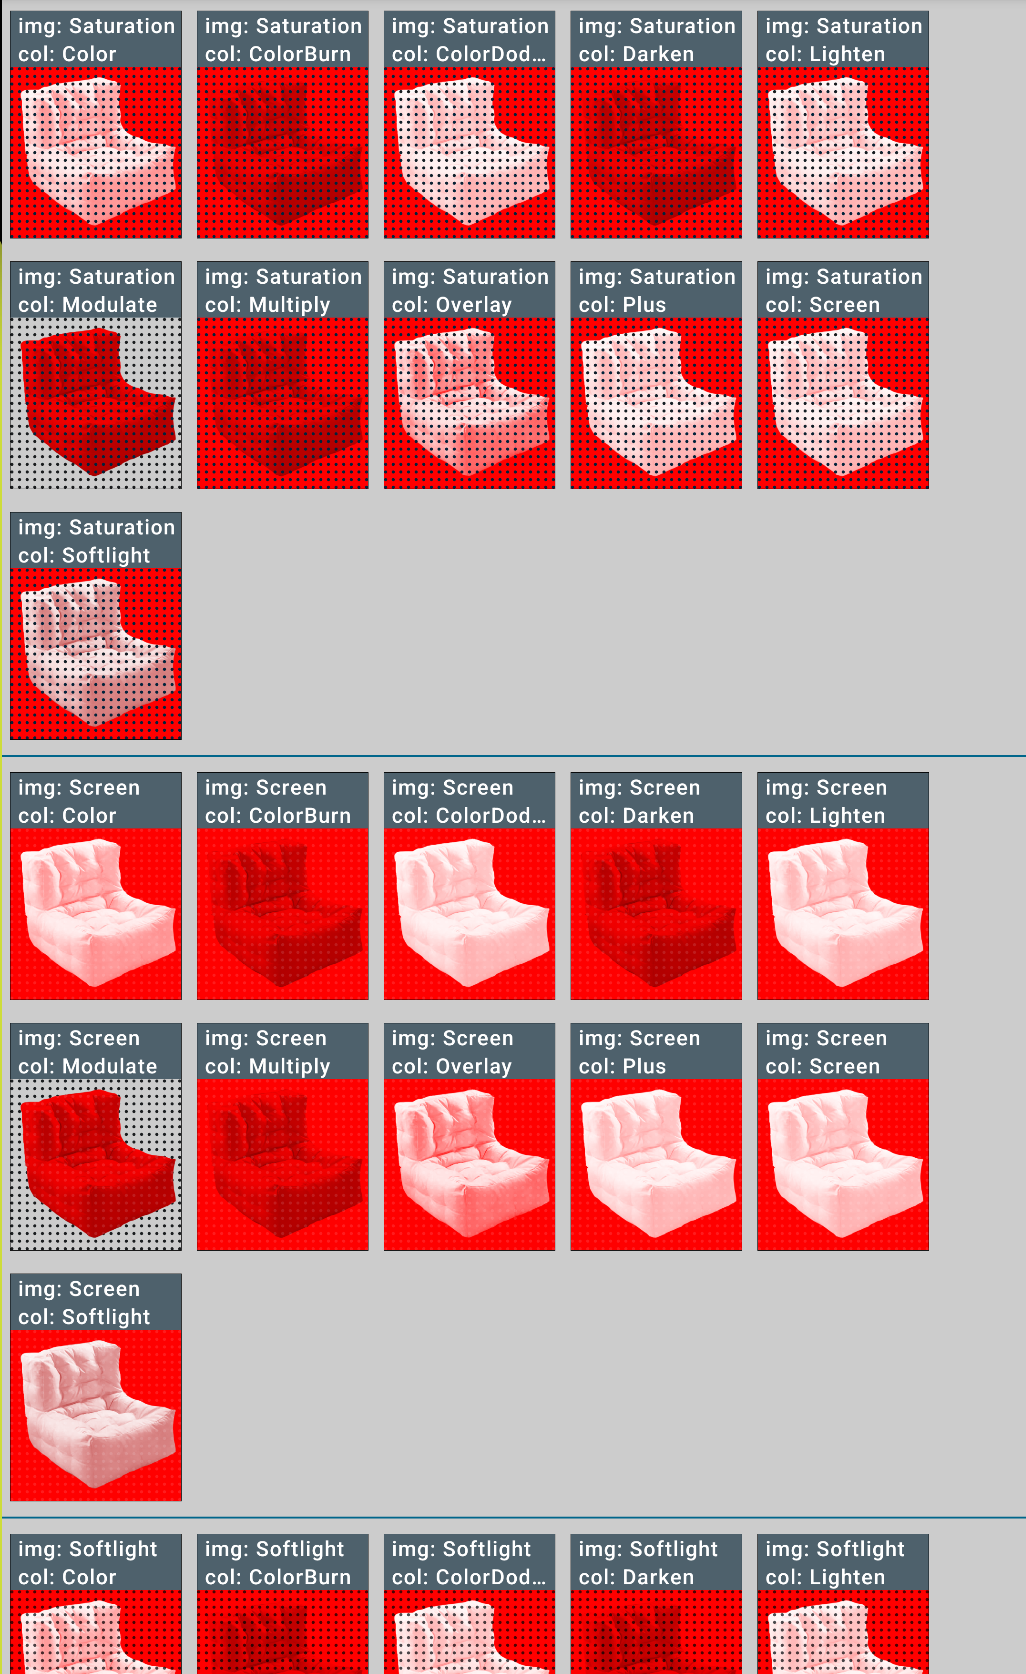
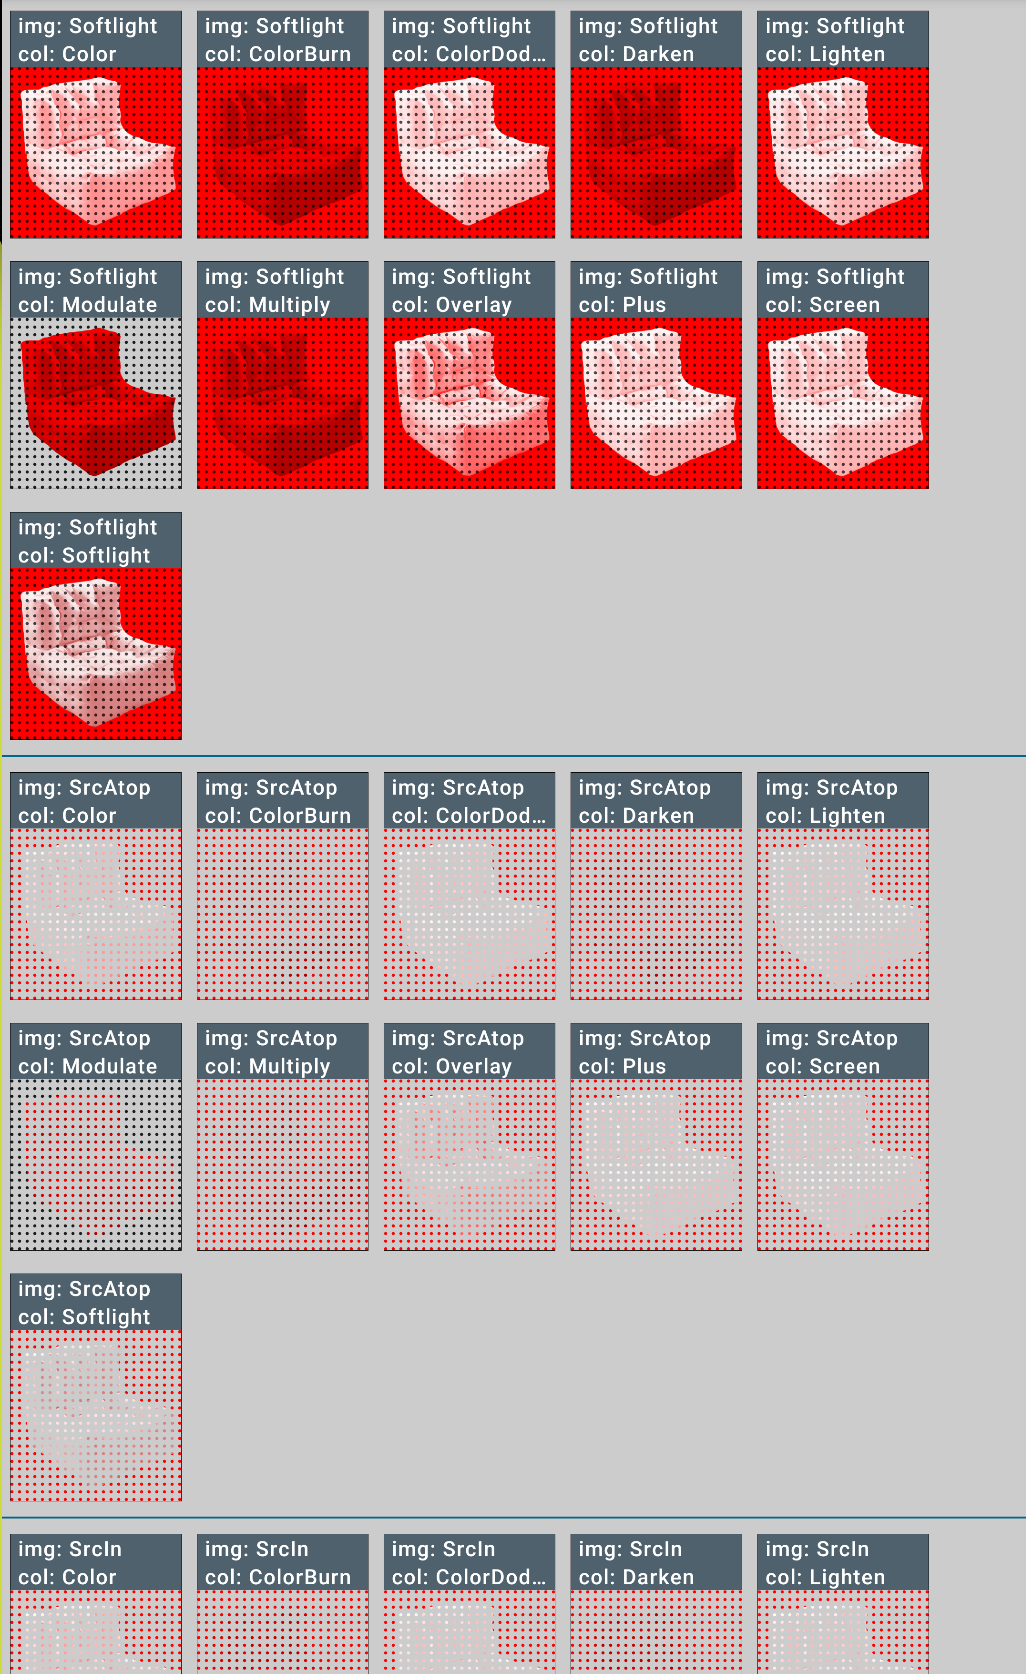
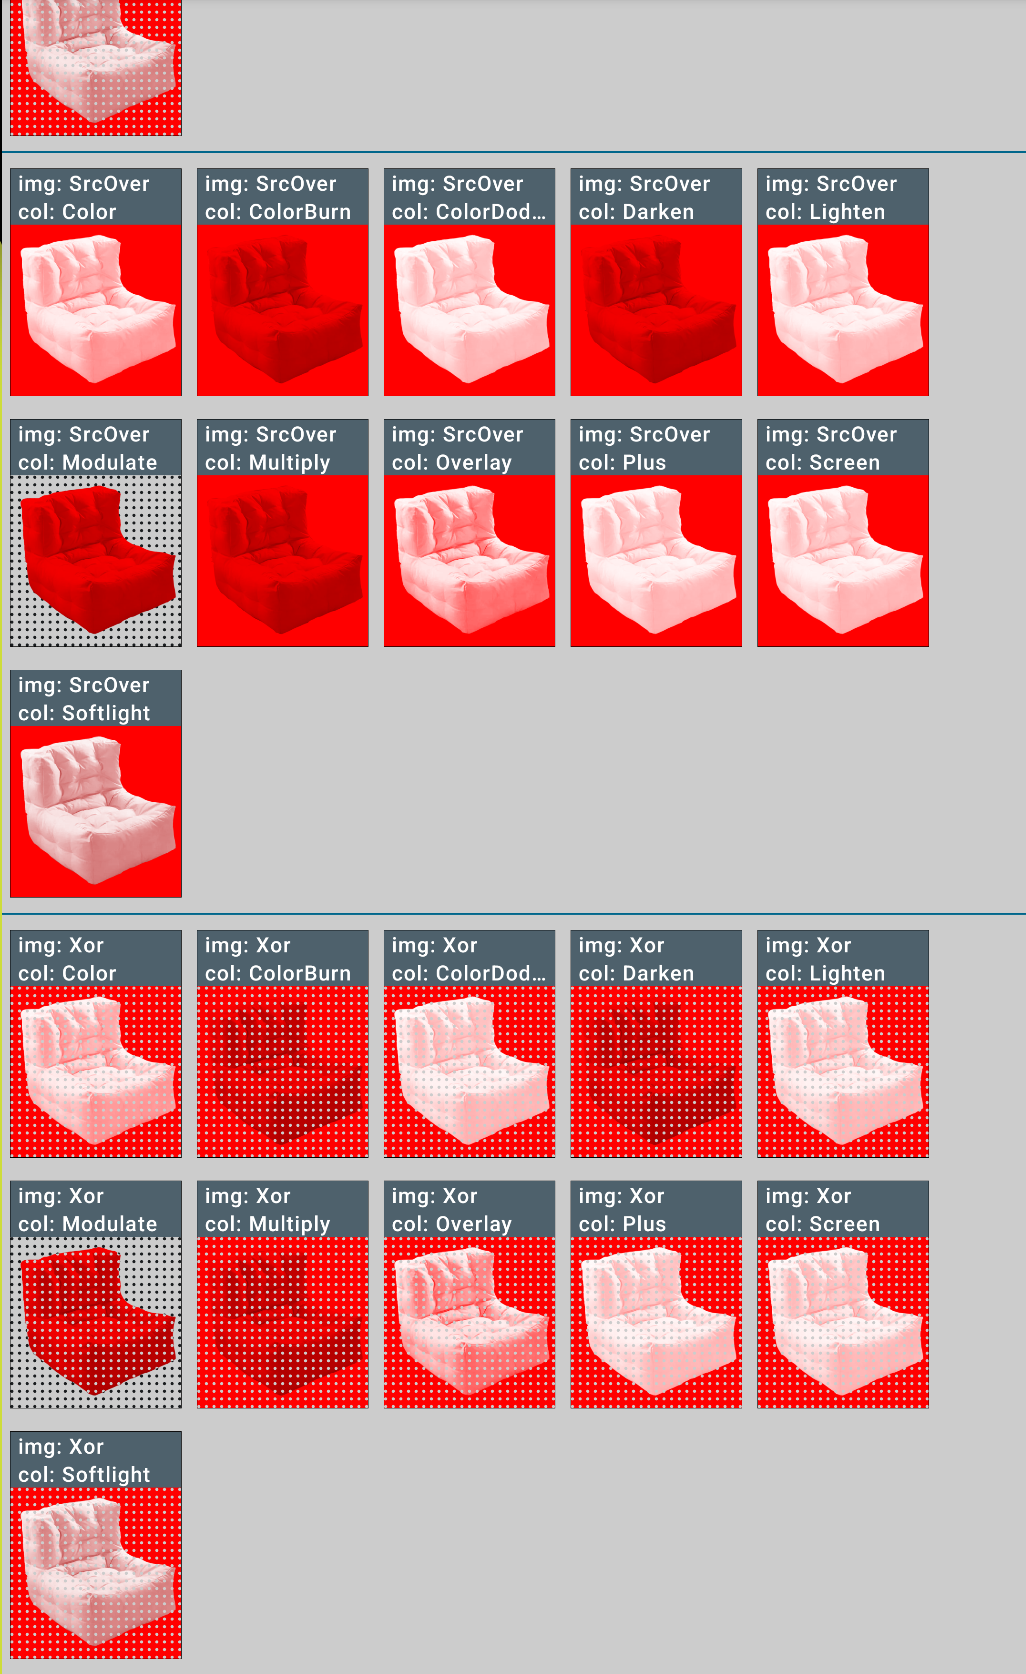
For a quick overview of all the possible combinations, here’s a small recording looping over all possible combinations of BlendMode. I excluded the BlendModes where nothing is shown or no compositing is done at all (Clear, Src, Dst).
Note that in this scenario, it is necessary to give the Box Composable a size Modifier, otherwise nothing constrains its dimensions and nothing is drawn when no size is given.
Box(modifier = Modifier.size(90.dp)
.graphicsLayer {
compositingStrategy = CompositingStrategy.Offscreen
}
.drawWithContent {
drawRect(
brush = polkaDotBrush,
alpha = 1f,
colorFilter = ColorFilter.tint(polkaDotColor),
)
drawImage(
image = objectToDrawOnAsImageBitmap,
blendMode = blendModeImage,
dstSize = IntSize(
this@drawWithContent.size.width.roundToInt(),
this@drawWithContent.size.height.roundToInt()
),
colorFilter = ColorFilter.tint(Color.Red, blendModeColor),
)
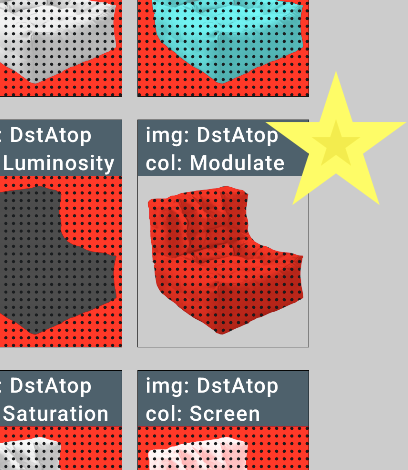
})In this plethora of combinations, actually only one is relevant for a straight-forward usage.
Excluding interesting and unexpected effects, if all we want is to see our base image with an added pattern and color, the only relevant values are:
drawImage BlendMode: BlendMode.DstAtop
colorFilter BlendMode: BlendMode.Modulate
With this combination, the pattern and color are only composited on the image, not on the background, and the colors match the assignment.
To scroll through the full-ish results (excluding all cases where the pattern or the color is lost), here are more captures of the results.
The full code is available here if you want to play with these results.