
The following article is a panorama of how the BlendMode values affect an Image when used in the colorFilter ‘tint’ function.
TL;DR:
When tinting a raster Image Composable with a solid color, use colorFilter.tint with either:
- BlendMode.Modulate with opaque color, or,
- BlendMode.SrcAtop for a color that has a non-opaque alpha value.
Please note: if you are not using the Image Composable, but rather a DrawScope (obtained with Modifier.drawWithContent for example), the choice is not quite the same, as we will examine in another post.
So, you want the longer story, I guess…
I recently needed to add color to an existing image which had transparency. My goal was to keep the image and combine it with a color, without changing the transparency. The ColorFilter-typed “tint” parameter of the Image Composable seemed like a good fit, but the BlendMode parameter had confusing effects, especially with its 30 or so values.
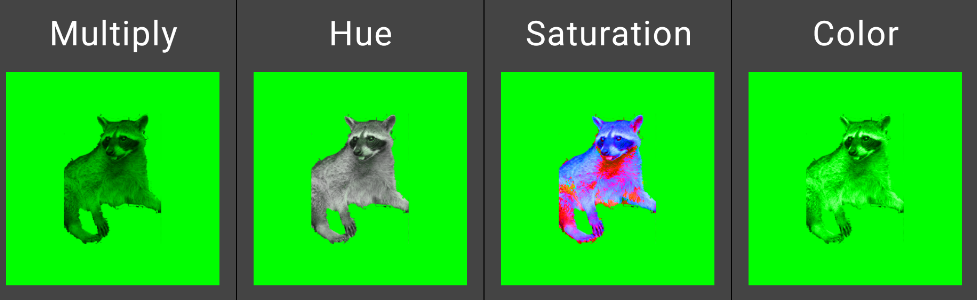
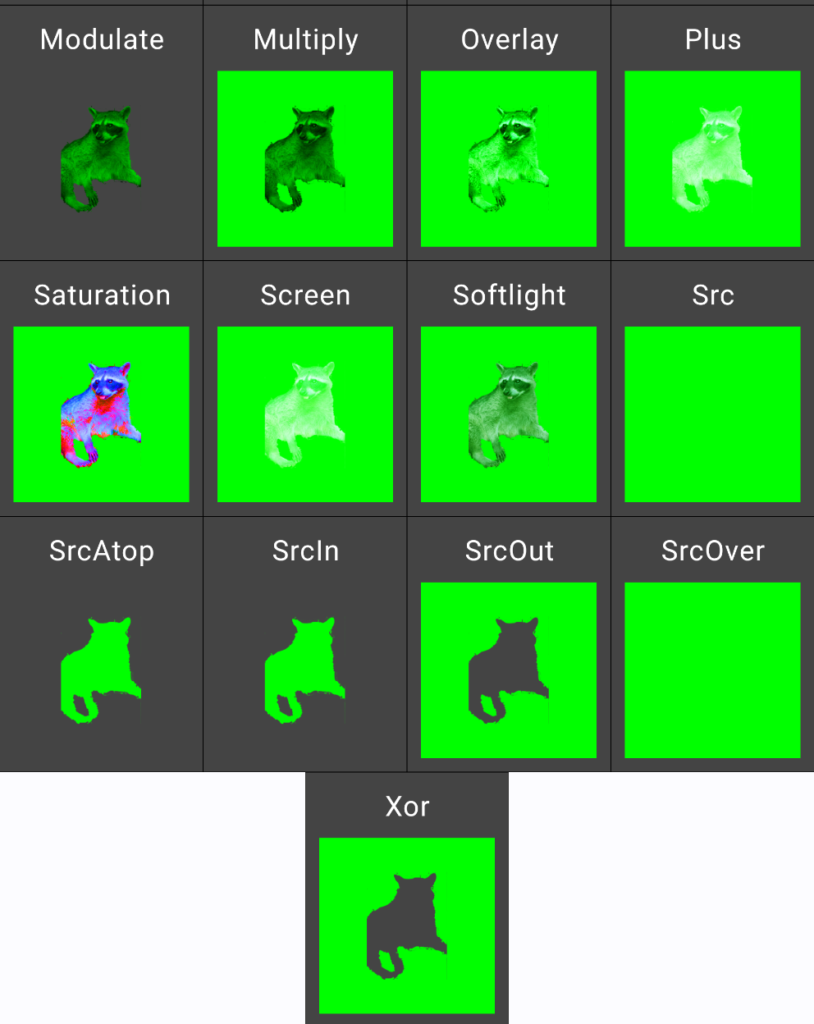
So, I have made a simple display to show the results of all the current BlendMode values when applied to tint a rasterized image that has low saturation (it is not greyscale, though) and contains transparency. In this first example, the tint used is opaque (i.e. it’s a color with alpha set 100%).
This is the image that will be displayed:

The code is more or less:
for (mode: BlendMode in listOf(/* all available BlendMode values */) {
  Image(
    painter = painterResource(id = R.drawable.ic_coati),
    colorFilter = ColorFilter.tint(blendMode = mode, color = Color.Green),
  )
}
Blending an image with an opaque color tint
The results are illustrated below in two parts.
Some things to note: we are not defining a non-default CompositingStrategy (for example, CompositingStrategy.Offscreen) so, when « Clear » is used, it is just removing everything.
As we can see in this example, this type of blending of an opaque color with a rasterized image does not use the full capacity offered by the various BlendMode values, as many of the results are similar. For example, the result with BlendMode.SrcIn (the default) is similar to with BlendMode.SrcAtop. BlendMode.DstOver is similar to BlendMode.DstAtop as is BlendMode.Hue. This would not be the case if using BlendMode with a source and destination that were both rasterized images, or both image vectors, or the tint had some transparency.
Blending an image with a non-opaque color tint
When the tint used is not opaque, the image used (obviously) can show through when it is placed under. For reference, here’s the same code, but with a Green color that has an alpha value of 30% instead of 100%.
Ping : Solving the problem of adding a pattern and a color to a raster image - Caravelle Code
Ping : How should you define images for your Android application? - Caravelle Code
Ping : Android Graphics arcs visual sampler - Caravelle Code