
How do you add image resources in your Android application with Android Studio? Is it an « image asset », or a « drawable »? This little post aims to clarify how you should define images for your Android application. When to use Drawables, Mipmaps, and when to define Density for your image resources in Android Studio.
Android Studio Resource Manager
When handling image resources, the Android Studio offers a slightly confusing UI in its Resource Manager UI.
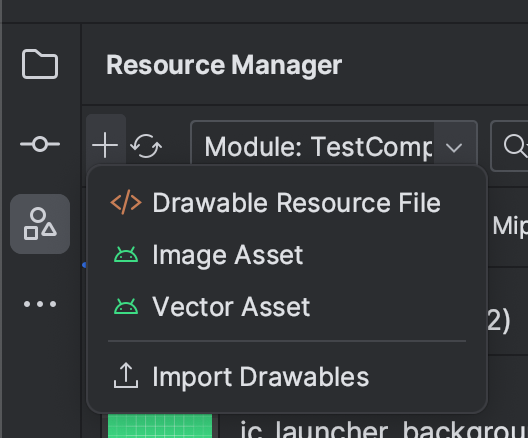
In the initial view of the Resource Manager, clicking the “+” button gives you 4 choices for adding image resources:
- Drawable Resource File
- Image Asset
- Vector Asset
- Import Drawables
If you want to add an basic image, you should probably use the option “Import Drawables”. A vector drawable is something which cannot be used for a raster-type image. As we shall see, an « Image asset » is only meant to be used for square or round icons.
Image resources, Drawables, and Assets
More generally, Drawables is the abstract term that Android uses for anything that can be drawn on the screen. It includes both raster (bitmap) images and vector graphics.
If the image file you import is large, then you should add avoid placing in the unqualified “drawable” folder. The Android system treats this folder as containing medium density images (same as « drawable-mdpi »). This can cause a crash if it is a very large image, because the system automatically re-scales displayed images. Unfortunately, this mechanism can fail if it the image is already large and the display is a high-density screen.
You can define help the scaling mechanism achieve its purpose by adding info to the image. When using the import wizard, define a “Density” Qualifier, and choose a value that reflects the actual density.
If you will be controlling the image size in your code, choose “no density”. This stops the resizing behavior used by Android platform when adapting your image to different devices. Images imported with “no density” qualifier are placed in the “res/drawable-nodpi” folder.
Mipmap image resources in Android applications
Confusingly, an “Image asset” is not just any image asset. The term is actually implicitly reserved for creating what Android calls a “mipmap”. A mipmap is a type of image which has square dimensions (or fits in a square). It is intended only for launcher icons and other square icons.
If, like me, you are intrigued by their silly folder name, don’t be tempted. Do not use the “Image asset” for anything other than app launcher icons or app icons.
Actually, the name mipmap is not silly at all, and actually comes from MIP mapping. MIP stands for « multum in parvo, » which is Latin for « many in a small place”, according to this page.
When possible, use vector assets for icons to ensure lossless scaling.
TL;DR: use Import Drawables for adding image resources to your application
Hope this clarifies how you should you define images for your Android application (yes I wrote that for the SEO plugin).