

aka How to put polka-dots or a checkered pattern on a suitcase
Previously on Caravelle Code…
We looked at how BlendMode works when tinting an image with solid color (opaque or translucent color) in a precedent article.
We also looked at how we can create patterns using a “shader brush” on a surface in another article.
In this episode
What if we want to add a pattern to an image?
That’s what this article focuses on: how does a patterned layer interact with an image? Again, the BlendMode chosen for the image will give us very varied results, so it’s important to pick the right one for the desired effect.
TL;DR: To add a pattern to an image, use a DrawScope, add a pattern-filled rectangle first, then draw the image second, and blend this Image in with BlendMode.DstAtop.
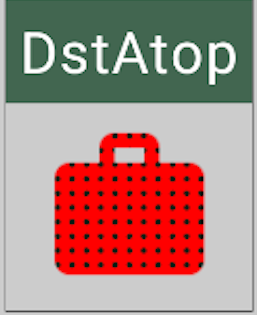
If you want to add a pattern to an Image, you probably want it to be « wall-papered » on the object, and BlendMode.DstAtop will give you this effect.
Note that if you draw the image before the rectangle, then the roles of « Destination » and « Source » are reversed, so you will need SrcAtop to get the wall-paper effect.
In a few more words, if you refuse to « DR »…
Combining an image with a pattern seems to require the use of a DrawScope, which is not necessary when only tinting an image with a solid color. For coloring an image, we can directly use the Image Composable and its colorFilter parameter.
In order to manipulate a pattern on the image, we cannot use the Image Composable (or at least, I’ve not succeeded in using it). In order to have layers and control how they mix, we need to access the DrawScope in some way.
In the context of the DrawScope, the image plays the role of the « Source » if it is placed second, while the pattern rectangle plays the role of the « Destination » in Canvas-speak. When adding the image, using the BlendMode DstAtop will ensure that the pattern is placed on top of the image, and is only visible where it overlaps with the image. Other Blendmodes also offer interesting and sometimes unexpected effects, that’s why it’s useful to take a look at the illustrations at the end of this post. If I were you, I’d even bookmark it for future use…
Using a vector image tiled pattern on an image
The pattern is created by using the Brush parameter when drawing a rectangle and adding a layer to draw the image (raster or vector) and handling how the layers mix via BlendMode. As far as I know, this is only possible by using the DrawsScope available in drawing Modifiers (Modifier.drawBehind, Modifier.drawWithCache, etc.) or a Canvas directly.
The basic drawing code
for (blendMode in listOfAllBlendModes()) {
      // ..
      Box(modifier = Modifier.graphicsLayer(compositingStrategy = CompositingStrategy.Offscreen)
                        .drawWithContent {
                            // 1) draw pattern
                            drawRect(
                                brush = polkaDotBrush,  // ShaderBrush shown below
                                alpha = 1f, // opaque
                                colorFilter = ColorFilter.tint(polkaDotColor),
                            )
                           // 2) draw image with blendMode
                            drawImage(
                                image = objectToDrawOnAsImageBitmap,
                                blendMode = blendMode,
                                dstSize = IntSize(
                                    this@drawWithContent.size.width.roundToInt(),
                                    this@drawWithContent.size.height.roundToInt()
                                ),
                                colorFilter = ColorFilter.tint(Color.Red),
                            )
                        }
      ) // Box content intentionally left empty
}
This example code loops over all possible BlendModes.
Creating the polka-dot image pattern with a tiled shaderBrush
The polka-dot pattern is drawn first as a rectangle filling the enclosing box. It is drawn using a dot vector image that is tiled repeatedly over the surface, and given a color (black here). It is opaque. The polkaDot ShaderBrush is created with an ImageShader:
val polkaDotAsDrawable = LocalContext.current.resources.getDrawable(R.drawable.baseline_circle_4)
val polkaDotImageBitmap = (polkaDotAsDrawable as VectorDrawable).toBitmap().asImageBitmap()
val polkaDotBrush = remember(polkaDotImageBitmap) {
        ShaderBrush(
            shader = ImageShader(
                image = polkaDotImageBitmap,
                tileModeX = TileMode.Repeated,
                tileModeY = TileMode.Repeated,
            )
        )
    }
Preparing the Drawable Image that will receive the pattern
Next, we draw the desired image « over » the rectangle. Our image is a Bitmap suitcase clipart. Some conversion is needed to transform the Drawable resource into an ImageBitmap which is suitable for using with drawImage.
val objectToDrawOnAsDrawable = LocalContext.current.resources.getDrawable(R.drawable.ic_suitcase)
val objectToDrawOnAsImageBitmap =
        (objectToDrawOnAsDrawable as VectorDrawable).toBitmap().asImageBitmap()
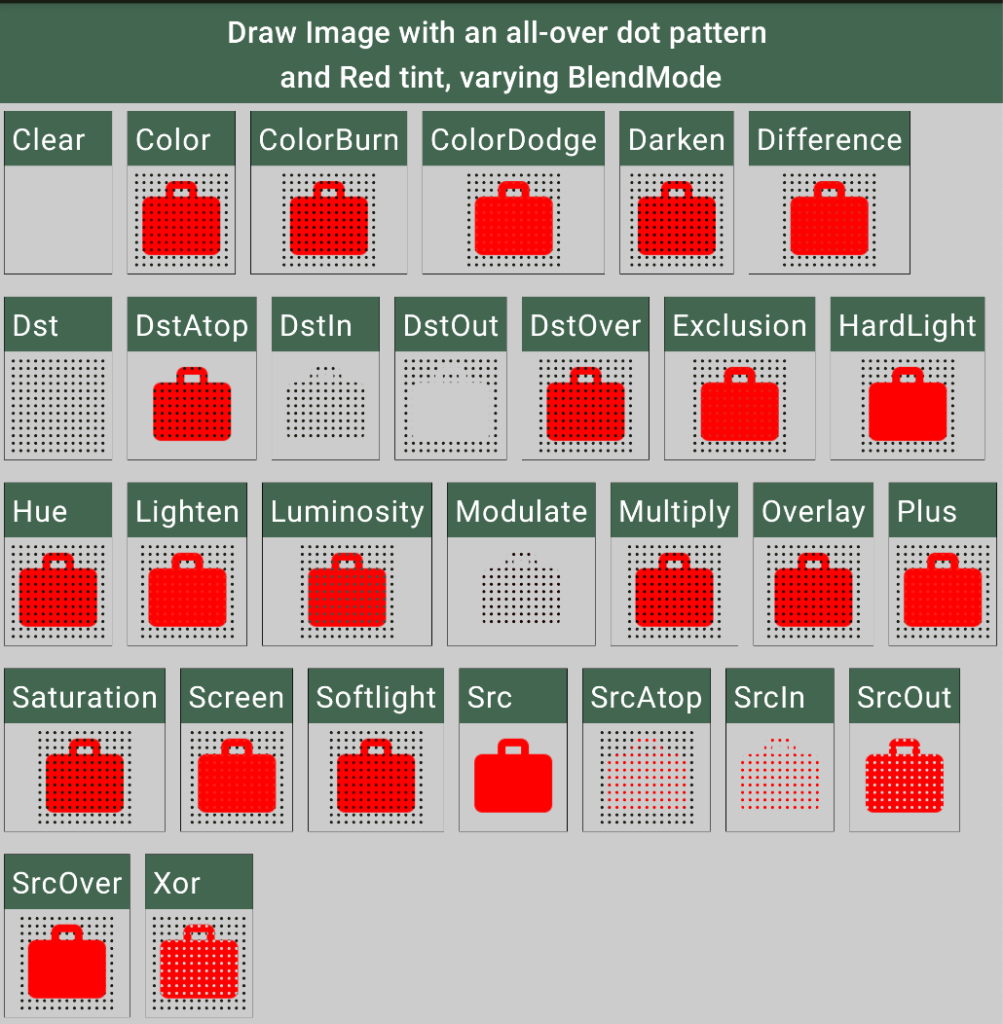
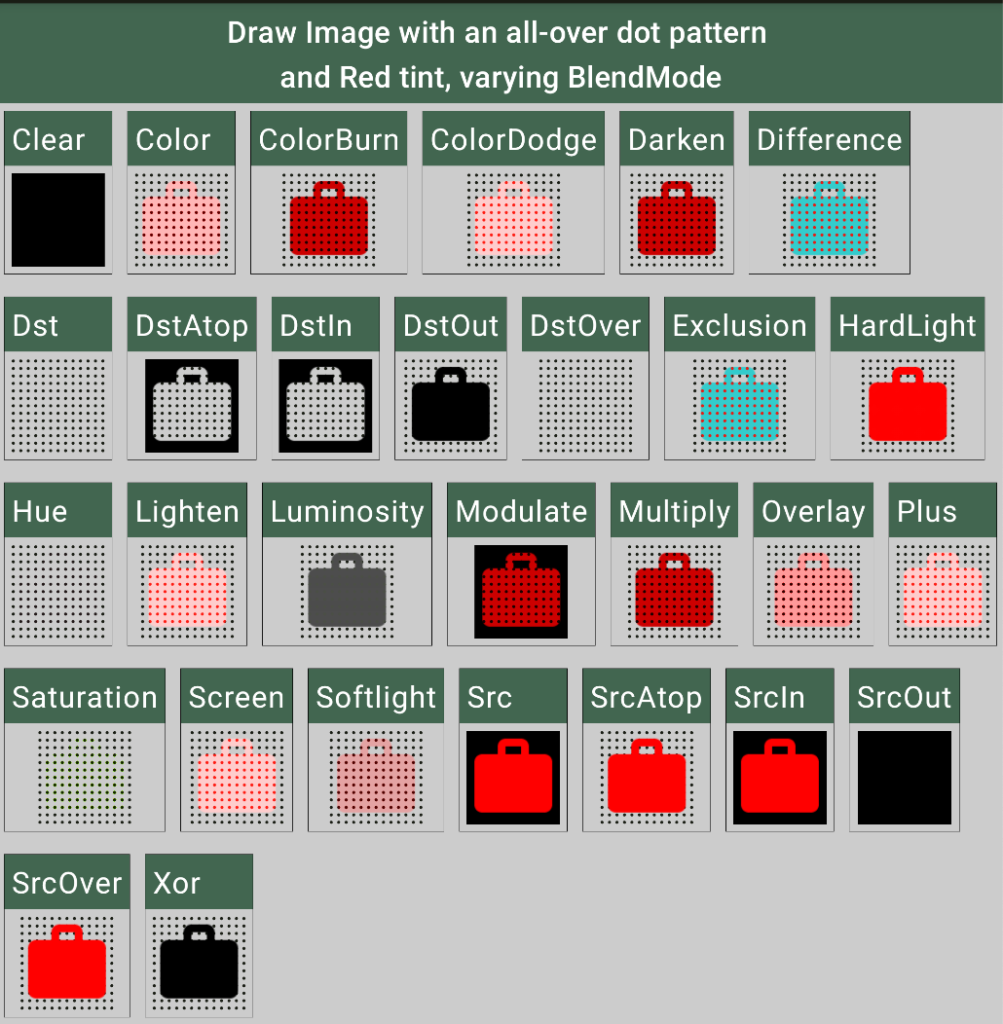
The resulting image differs wildly based on the chosen BlendMode but also depends on the CompositingStrategy
The screen capture below illustrates the resulting image for each given BlendMode. The underlying Surface has a light grey color which stays visible even when all other layers are removed (for example, with BlendMode.Clear) because we used the CompositingStrategy.Offscreen in our graphics layer. Without this Compositing Strategy, the Box has a black background color, and the red tint of the suitcase image will sometimes be altered, as shown below. As we can see, this CompositingStrategy parameter can have massive effects on the result of our blending.
Image on the left uses CompositingStrategy.Offscreen, image on the right uses the default CompositingStrategy.
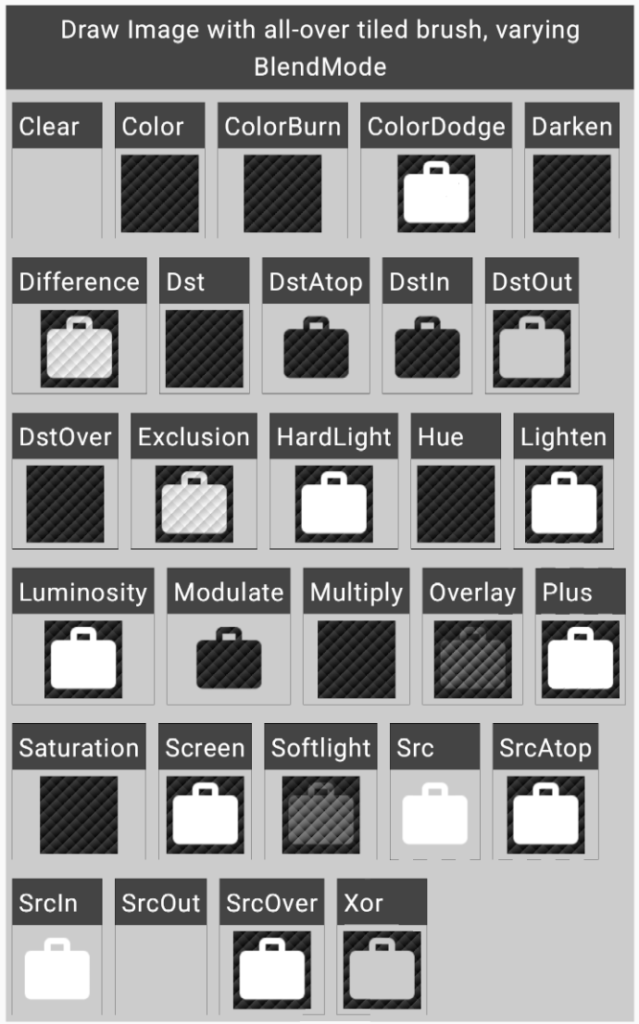
What about layering patterns and an image?
Can we layer some simple shaderBrushes like we did in this other article? Of course we can! I’m not sure how efficient this is, but it does work. If we continue to place the « image » at the end of our stack of layers, using the BlendMode DstAtop is still the best strategy here (Modulate works too, especially if your image is more than just an outline like this suitcase clipart, and you want the details to show through, like we did with the coati / raccoon image).
Note that the piled on shaderBrushes need to be a little bit transparent for the checkered pattern to emerge from the two layers of stripes.
Here is the core part of the code:
                  Box(modifier = Modifier
                        .graphicsLayer(compositingStrategy = CompositingStrategy.Offscreen)
                        .drawWithContent { // this: ContentDrawScope
                            drawRect(
                                brush = tilted1GrayBrush,
                                alpha = 1f,  // opaque first layer
                            )
                            drawRect(
                                brush = tilted2GrayBrush,
                                alpha = .5f, // translucent second layer
                            )
                           // final image layer is the "Source"
                            drawImage(
                                image = objectToFillImage,
                                blendMode = blendMode,
                                dstSize = IntSize(
                                    this@drawWithContent.size.width.roundToInt(),
                                    this@drawWithContent.size.height.roundToInt()
                                ),
                            )
                        } ) // Box has no contents
All of the source code for this example is in this github repo (linked to the main class directly).
Ping : Solving the problem of adding a pattern and a color to a raster image - Caravelle Code
Ping : Android Graphics arcs visual sampler - Caravelle Code